This week is going by so quickly. Thank you for all of your comments and feed back. Remember that two winners will be randomly chosen from all of the comments this week to receive a grab bag of 25 stamps from Unity Stamp Company. I will pick the winners late Sunday, so you have until then to leave comments. I will also pick a bonus winner for 3 new Distress Oxide inks that I have as extras.
I am going to talk faces today. When I first found the Unity Stamp Company I noticed that several of their beautiful Angie girls had blank faces. I admit that at first I wasn’t sure that I really liked them and didn’t know how I would use them. Then I noticed how beautifully some of them were colored and made so that they could be any woman and any expression based on the sentiments with them. The more I used them that way, the more I like them that way. However based on some posts from the Show and Tell page there are people who would like faces on their Angie girls. I will try to show the same stamp as they are and some options for putting faces on them. I honestly don’t think there is a right or wrong on adding faces because it is strictly a personal preference and I like it both ways. If I were really talented, I could draw my own face, but that is not an option, lol.
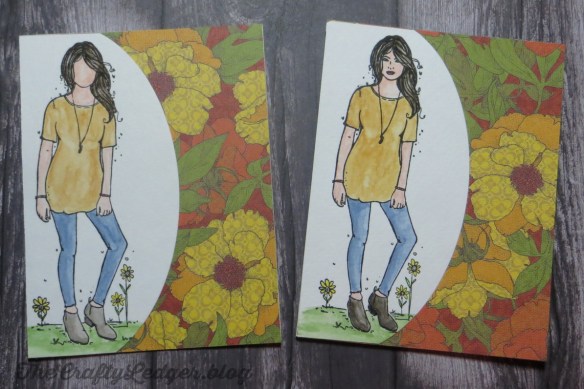 This image is from the January 2018 KOM called Twinkle. I colored both the same way with water colors on watercolor paper. I used a large oval to cut the edge and placed it on a piece of cardstock from a paper pack by The Paper Studio called Sunbeam Meadow. I found if I pick my paper first, I can match the colors to paint with easier than trying to find paper to match what I already painted. The image on the left is the original stamp and the one on the right uses a Unity stamp set called Angie Girl Faces. I will warn you that these stamps are tiny (in fact I have two because I lost one set for a little while) It works beautifully with this stamp. One face is with eyes open and one with eyes closed. The thing about this stamp is that it doesn’t fit a lot of the Angie Girls. To see if the faces will work with a stamp, I have stamped both images on an piece of acrylic with Satzon ink. You can also just use a scrap piece of plastic packaging. This allows you to place them over your stamped image to see how they will work.
I also put a simple mask made from a post-it note over her hair because the eyes were going to stamp into the hair which I didn’t want (hair in my eyes bugs me in real life too). I used a Stamp-a-ma-jig to be able to place the face in the correct place.

Here is another bigger stamp that Angie Girl faces will not work with, so I went a different way.
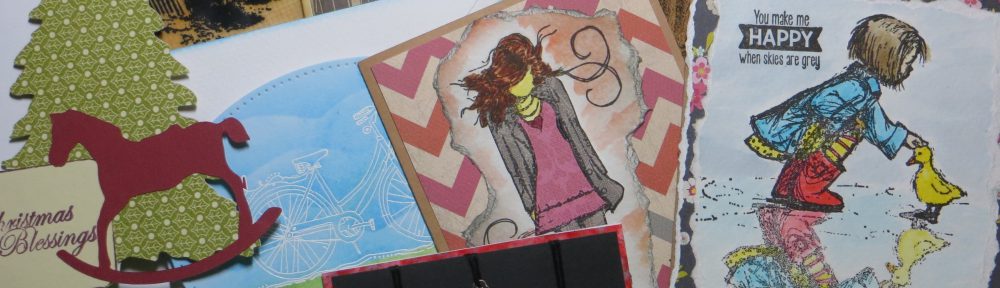
 This image is called I Hope You Feel Beautiful and the sentiment is from Eloise Girl. This face came from a set by Peachy Keen. They are clear face stamps that come in sets of multiple sizes of the same image for different things such as people, animals, snowmen, etc. They are meant to be used with die cuts such as those done on my Cricut machine. I stamped all of them out on an acrylic sheet just like the Angie Girl Faces to see if any of the sizes will work with the various Angie Girls. A couple of notes: One – they really only work for front facing images, not those looking off to a side; Two – they seem to be made for faces that are shorter than the Angie Girls. In order for them to look right, I put a piece of painter’s tape over the mouth and nose and inked it up. I removed the tape and stamped the eyes. I then covered the eyes with the tape, inked it, removed the tape and stamped the nose and mouth lower on the face. The paper is from Shimelle called Little by Little. I used some rick rack that I had in my stash. The images were colored with my Spectrum Noir markers. This also needed a mask (made from a post-it note) to keep the eyes out of the hat before stamping the face.

I am not forgetting about the guys either.
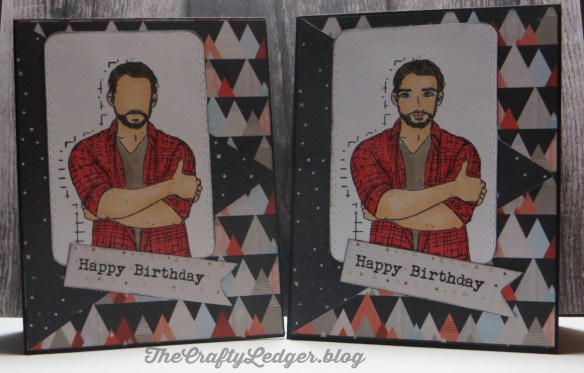
This is Forrest Guy. As with the prior Angie girl, I used a face from a Peachy Keen set. I also had to stamp the eyes separately from the mouth. This was especially important so that I could fit the mouth inside the mustache and beard. I stamped with a dye ink and then colored with my Spectrum Noir markers. The patterned papers are from a 6 x 6 pad called Outfitters by Pink Paislee.
Let me know which is your preference – face or no face. I will finish up this fun week tomorrow. – Denise


 I also embossed the sentiment before distressing it. As I used the blending tool, I wrinkled the paper. I decided to just go with it since it was to be a messy card anyway.
 .
.


