BBTB2 – Warm and Cozy – Layer it Up.

This is the last challenge for Bitten by the Bug 2 for the time being.  Alicia, who has been a great leader on that blog, is taking a hiatus until life calms down.  Bitten by the Bug is doing it big for this last challenge and joining with Double Trouble in a Warm and Cozy – Layer it Up Challenge.  Here is my take on the challenge which is to include layers.

Bags

I made these cute bags to hold packets of flavored hot chocolate that I gave for Christmas.  What is more warm and cozy than hot chocolate? I found this bag from the Plantin School Book cartridge (#M3E4ED on Access) and the cocoa mug is from the Savory cartridge (#M31821 on Access).  I sized the bag to fit the packets and the cup to fit on the front of them.  Double sided paper from Authentique made the insides cute too.  I used solid colored scrap paper for the cup.  I was going to use vinyl for the chocolate part and word.  When I opened my vinyl drawer there was some brown glitter vinyl there that I thought would make a sparkly addition to it.  I have only used holographic glitter vinyl before, and this was the first time I had used actual Cricut Glitter Vinyl.  While it is very pretty (hard to tell from this picture), it was very difficult to work with.  I tried three different kinds of transfer paper and tape and none of them wanted to stick to it.  I finally just kind of took a part of the word off and started to apply it, peeling the backing off as I went.  I will have to figure out a better way to use it in the future.

Make sure to link up your project at Bitten by the Bug 2 and  doubletroublechallenge.blogspot.com  in the next two weeks.  They must have layers and use a die cut (it doesn’t have to be on a Cricut for this challenge.)

I have had fun being part of the team for Bitten by the Bug these past two years and thank Alicia for giving me the chance.  Hopefully it will be back in the future. – Denise

BBTB 2 – Any Holiday

This is the last challenge of the year for Bitten by the Bug 2 and is called Any Holiday.  Since we have pretty much covered Christmas, I decided to do an Easter Card.

easter_card

I found this cute little bunny called Chocolate Bunny that is part of the Create a Critter 2 cartridge.  The banner in the back is from The First Few Years.  I choose a pretty lilac plaid to use for the banner, sentiment background and his cute bow tie.  I embossed a plain purple cardstock with a Darice folder.  The sentiment is a clear stamp set that I have had for quite a while and do not know the manufacturer any longer.  This was a very quick card to do and will be fun to send out this spring.

Feel free to make a project using your Circut for any holiday and link it up at Bitten by the Bug 2 by January 2, 2022.  I guess we need to get used to saying 2022, lol.

May everyone have a blessed New Year! – Denise

BBTB2 – Ornaments

The Holiday Season is upon us and the challenge at Bitten by the Bug 2 is to make an ornament using your Cricut.  This challenge is perfect for me since I make ornaments each year for my family.

fronts

These are the ones I have finished so far (and yes, I am behind this year!).  I try to pick out something important or new that has happened during the year for the recipient.  The top is for my daughter who was married in June.  The wedding took place in their backyard with the mountains in the background.  She had designed an SVG of those mountains which we used in various decorations at her wedding and I used it once again for this ornament.  The silhouettes are from Design Space and called Prom Couple.  I cut the mountians out of vinyl since the lines were so delicate and did a reverse weed on them. The bottom left is for my granddaughter celebrating her first year running cross country.  The image is an image called Cross Country from the Total Sports cartridge.  I used cardstock and a gold glitter cardstock for the frame.  The final ornament is for my daughter-in-law who took a trip earlier this year with her best friend to Cape Cod.  All the images on it are available on Cricut Access, but are also on cartridges I already owned.  The little crab and lobster are brads from Eyelet Outlet.  I cut off the back tines and used Zots to attach them.  These are all mounted on some paper-mache ornaments I found at Hobby Lobby.  I put Mod Podge on the fronts, then tissue paper followed by another layer of Mod Podge.  When it was dry, I cut around the edges.  The wedding one is patterned paper I had.  I let the Cricut cartridge cut out the circle, which I sized based on the measurements the package listed.

I put the details on the back of each ornament using vinyl lettering.

backs

And since these ornaments are 1/4 inch thick, I used ribbon from my stash to put around the outside edge of each ornament.  This is the ribbon I used for the Cross Country one.

sides

While these aren’t as fancy as some I have done in previous years, I think they will like them.  Only two more to go for this year.  Have fun and make some of your own using your Circut in some way and link them up by the end of the day December 19 over at Bitten by the Bug 2 . – Denise

BBTB2 – Fun and Games

I am the host for the current challenge at Bitten by the Bug 2 and I chose the theme “Fun and Games”.  I love playing board and card games, so I had started a tradition of hosting a family Euchre tournament around Christmas time.  While we haven’t had it the last couple of years due to other obligations and then COVID, This year we are having it again and I have some items that I will use for it, including this crown.

When we do this tournament, I make a game schedule so that after everyone at a table deals, partners switch and start a new game.  We keep track of things like total points earned for each player, loners made, Euchres made, etc.   Then I give prizes for various things including the least points so that everyone has a chance to win something.  One of the most coveted is the “Loner Crown”  If you make a loner, you get to wear the crown, but as soon as someone else makes a loner, they take the crown from you.  The person who is wearing the crown at the end of the tournament wins a prize.  People tend to make a big production out of taking the crown away.

I had a crown that we had used for several years, but it was layered and some of the layers had started slipping, so I decided to make one that incorporated  more of a card theme.  I was just going to redo the old one on Design Space and add the different suits to the design.  I searched and searched, but couldn’t find the design I had used or the project itself.  I finally took off the filter that limited me to images I owned and found the crown, but it wasn’t a part of a cartridge I owned, so I was confused.  Then I thought about just how long it had been since I made and then I remembered.

Gypsy

If you have been working with Cricut for a long time, you might recognize this.  It is called a Gypsy.  Before Design Space, was Cricut Craft Room, and before that was the Gypsy.  You loaded your cartridges unto the Gypsy and then you could design with it and do such things as weld, slice, etc.  When Cricut first announced they were going to an online software, I purchased a used Gypsy as a backup to my own Gypsy, because I couldn’t imagine that I would be using the internet for my Cricut.  We did not have reliable internet at home at the time.  The used Gypsy had some cartridges loaded on it, that were different than what I owned, and voila- the missing crown.  I actually charged it up and brought up the project just to see if I could.  My brother has my old Expression machine, or I might have even tried to make it using this Gypsy.

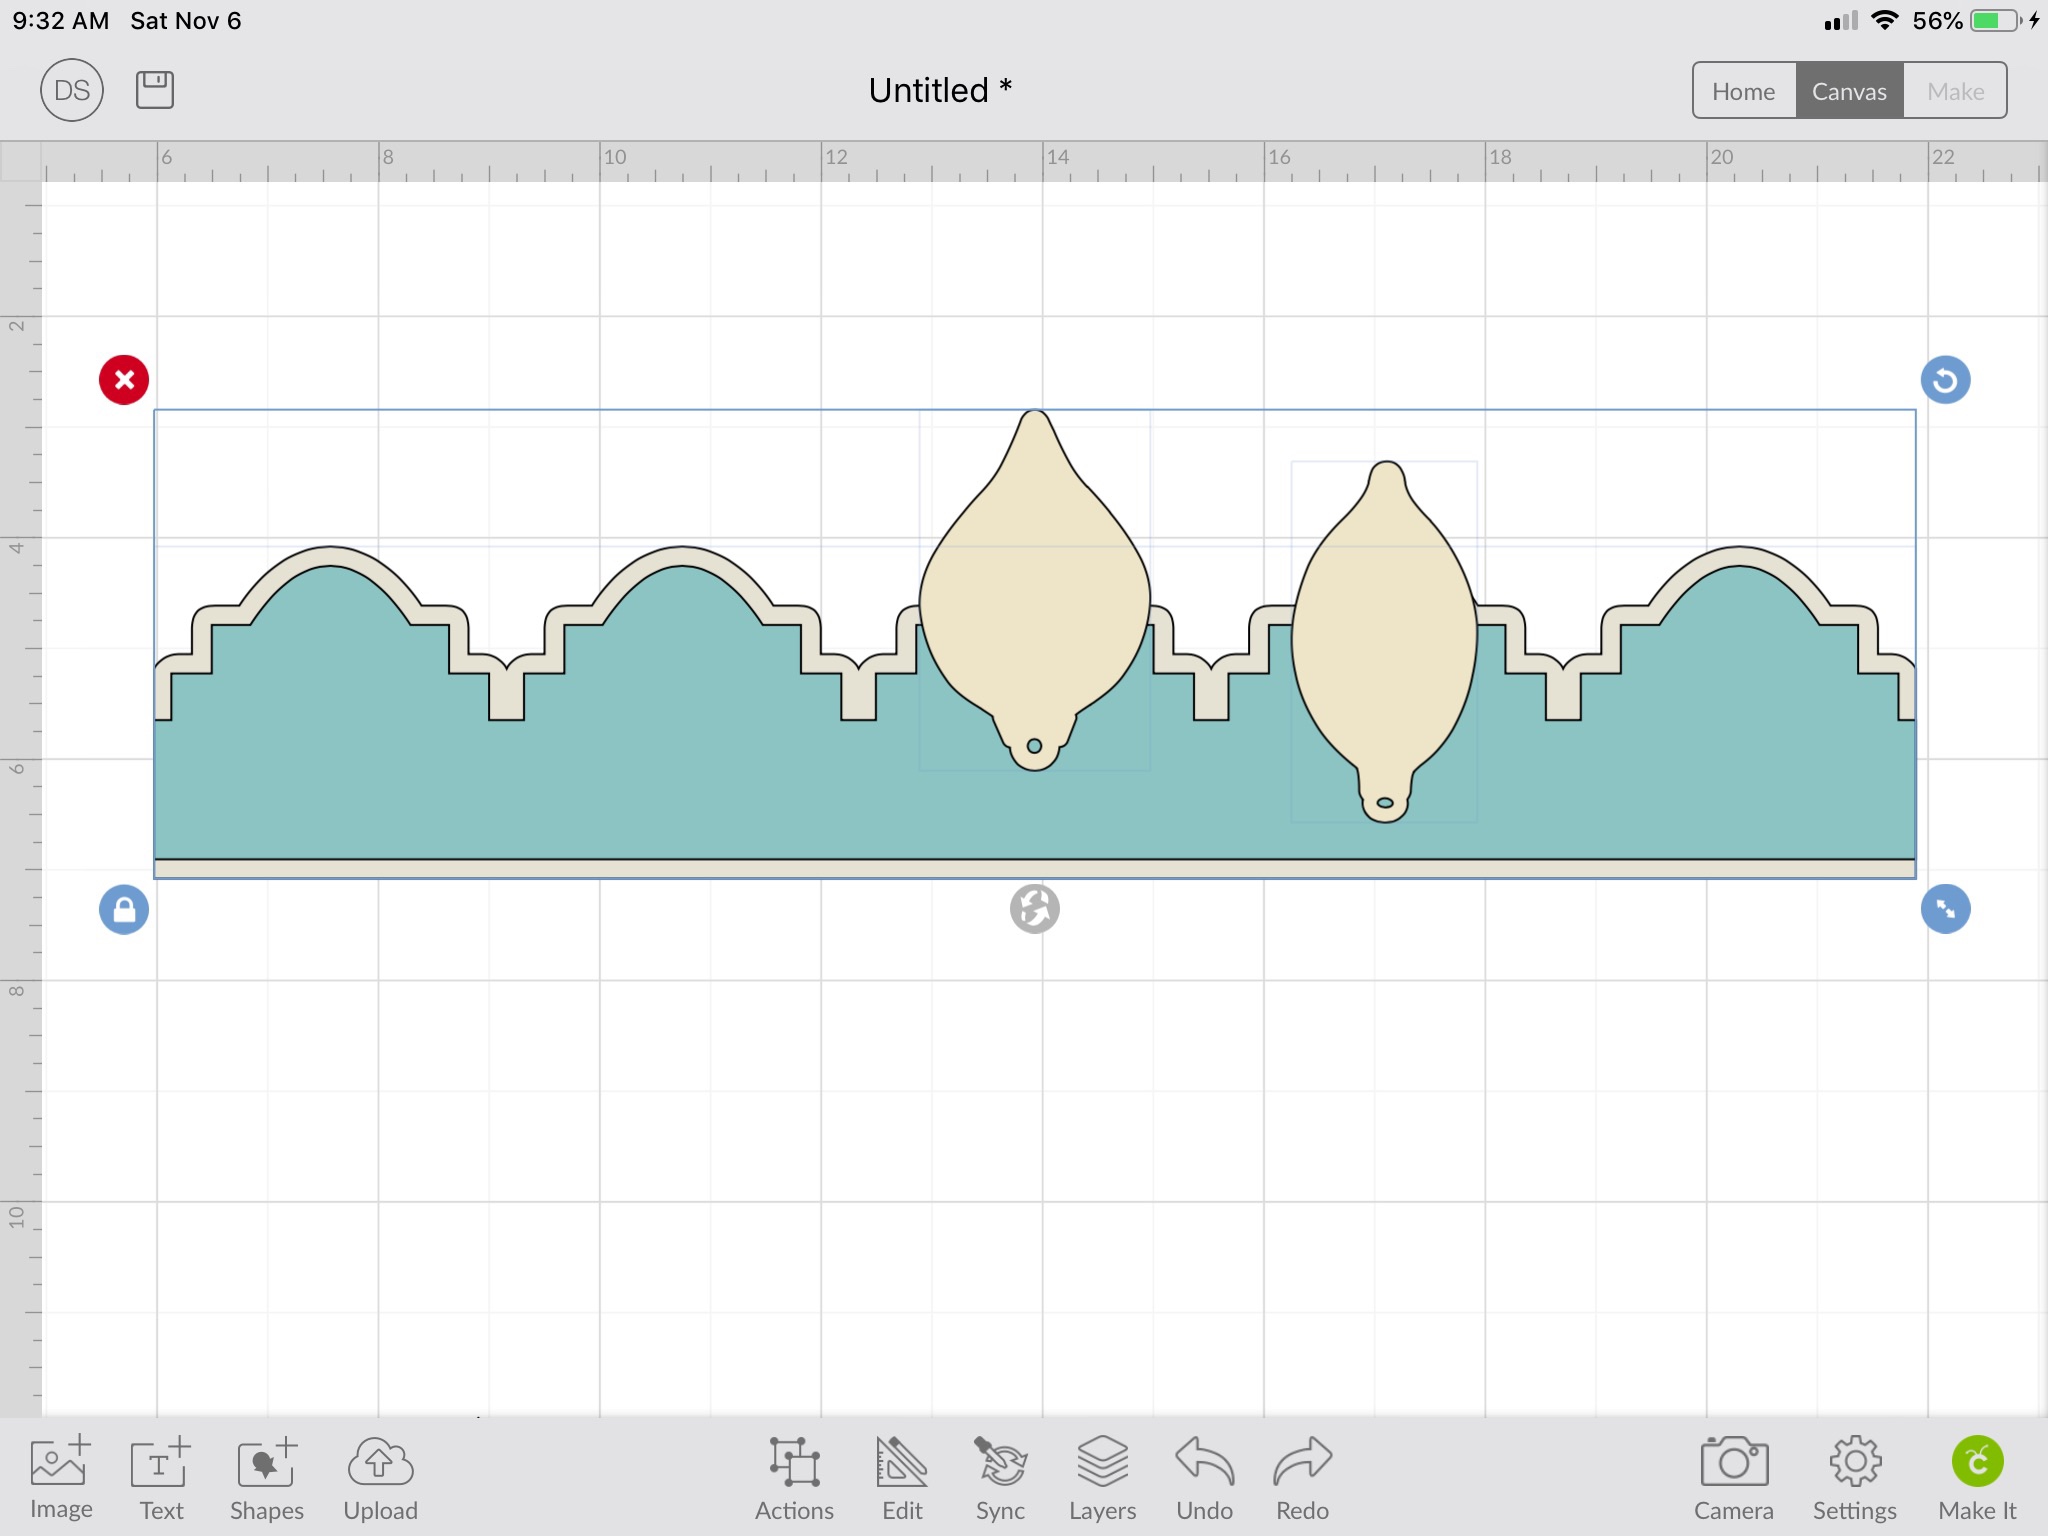
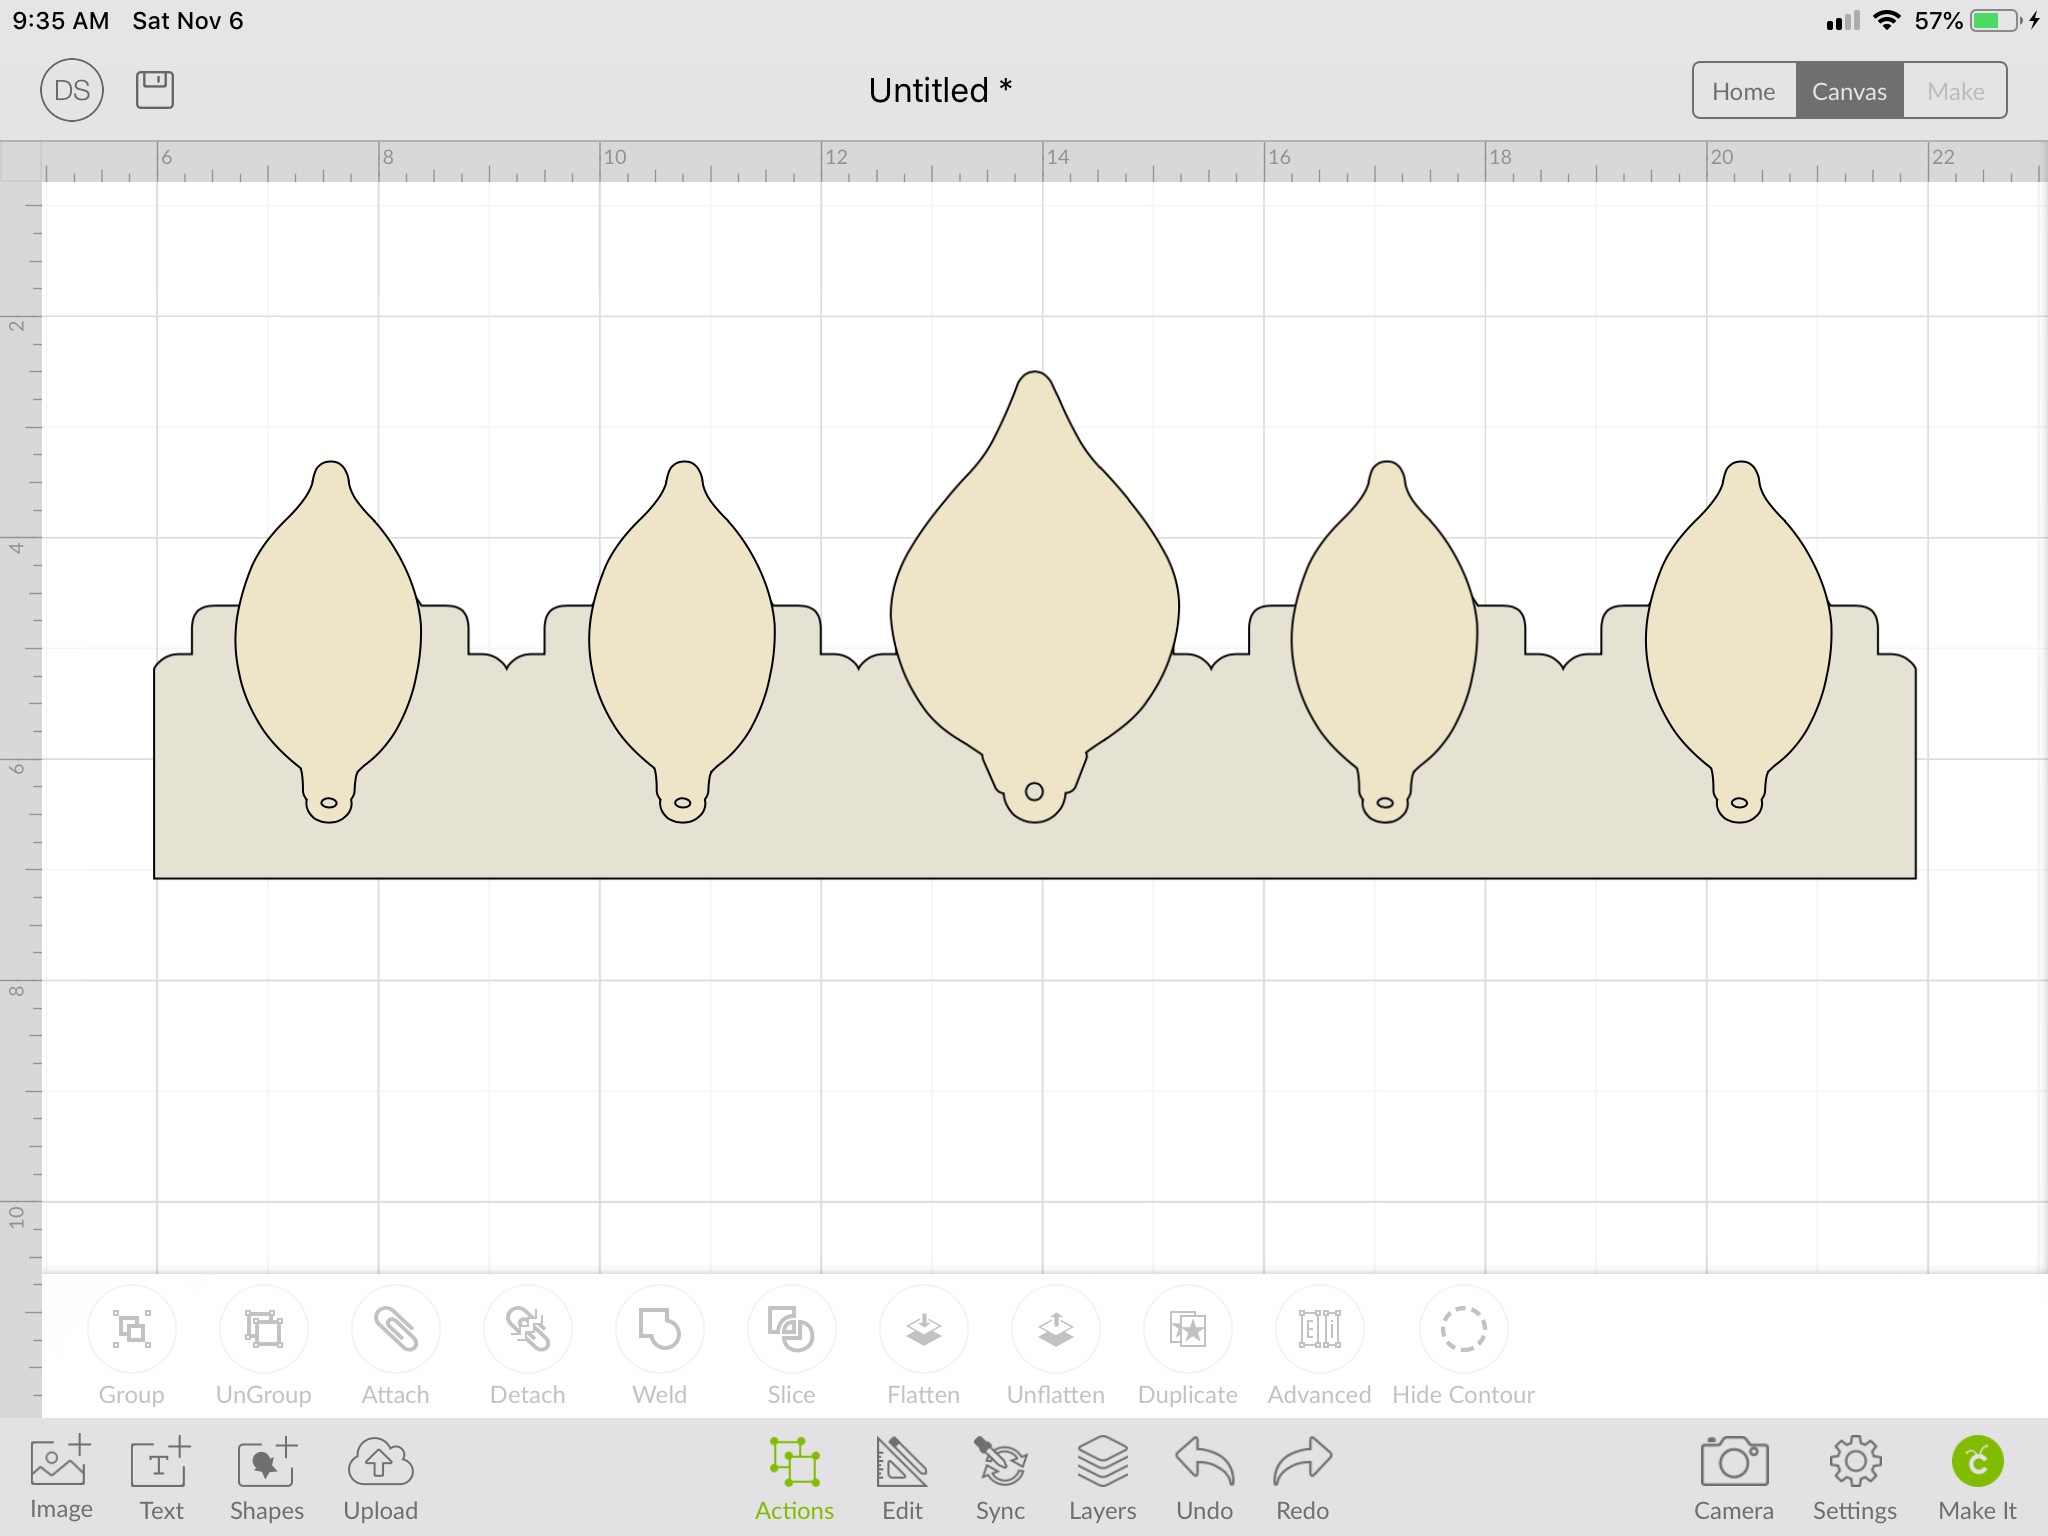
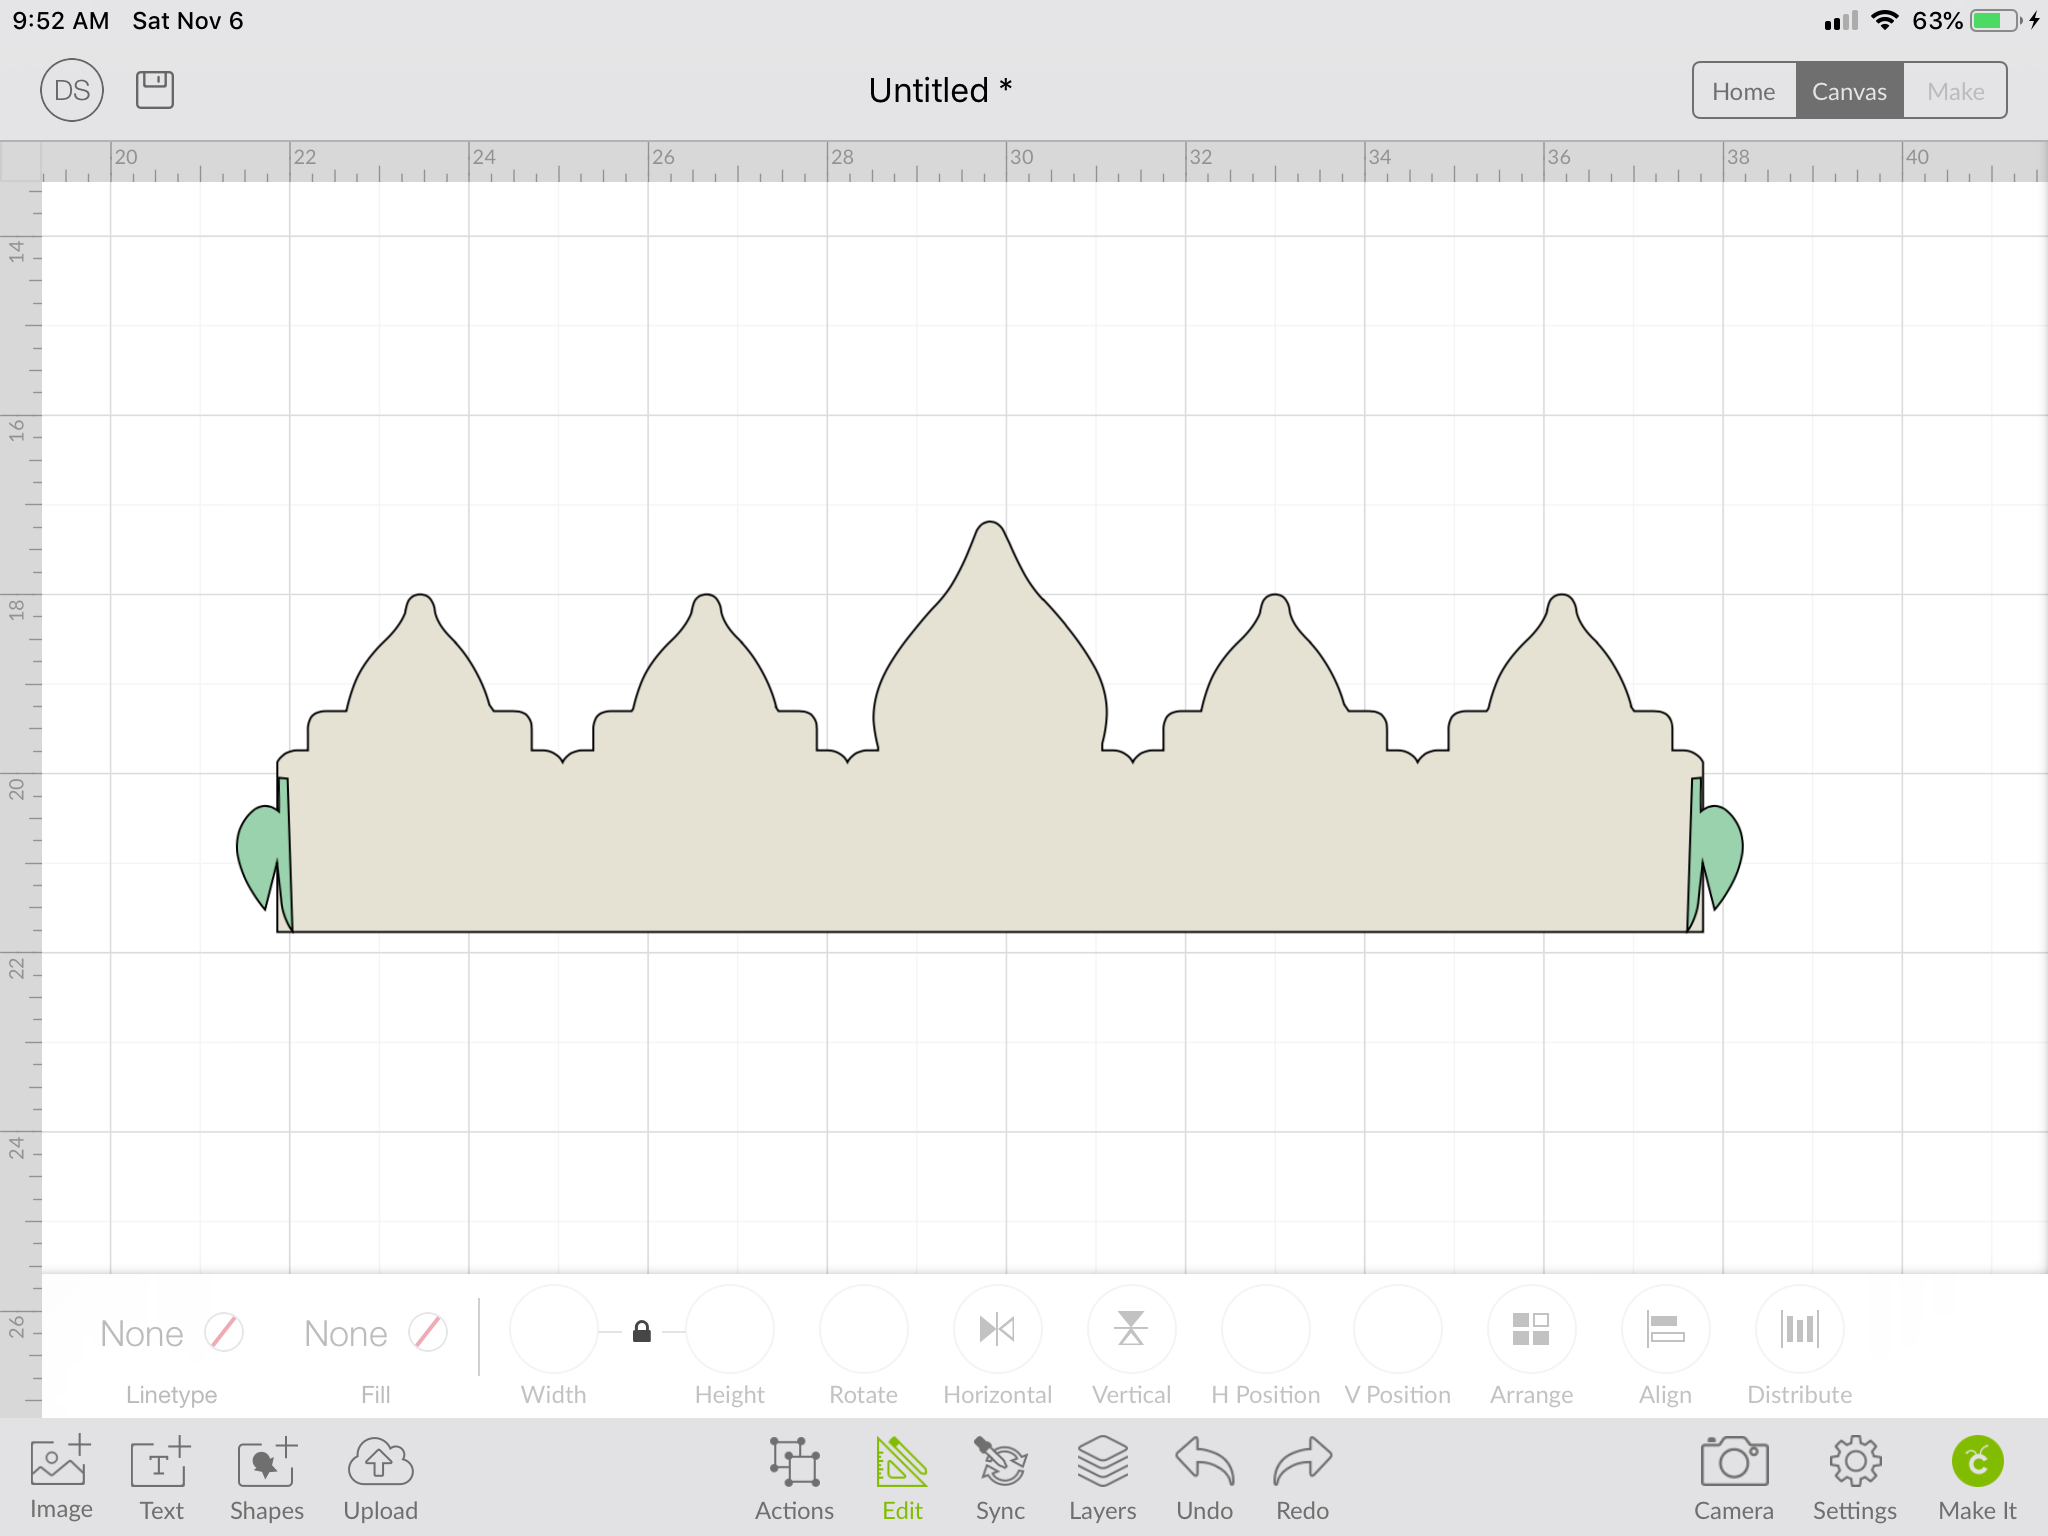
Design Space does have a lot of advantages over this Gypsy, but it meant I had to make my own crown, since I couldn’t find something that would work.  I was able to kind of use elements of the old crown including the fact that it is in two parts that hook together to make the crown.  Putting several slits in the back piece means it is adjustable so that it can fit several different people.  I started by looking at borders to see if there was a shape that would work. I came up with image #M429AZ from “The First Few Years” as a start, then looked for shapes that would work for the larger points of the crown and there were two ornaments from Anna’s Winter Wonderland that looked pretty good.  Finally I need some sort of hook to put on the ends to work with the slots on the back shape.  Since I thought that was the way the cupcake wrappers worked, I looked at various ones of those and found what I wanted as part of the Close to My Heart cartridge called Artiste.  Below is a gallery of the various steps I took to make the design, including welding and slicing off the hook from the cupcake wrapper to weld on the crown.

I forgot to take a screen shot of the final weld.

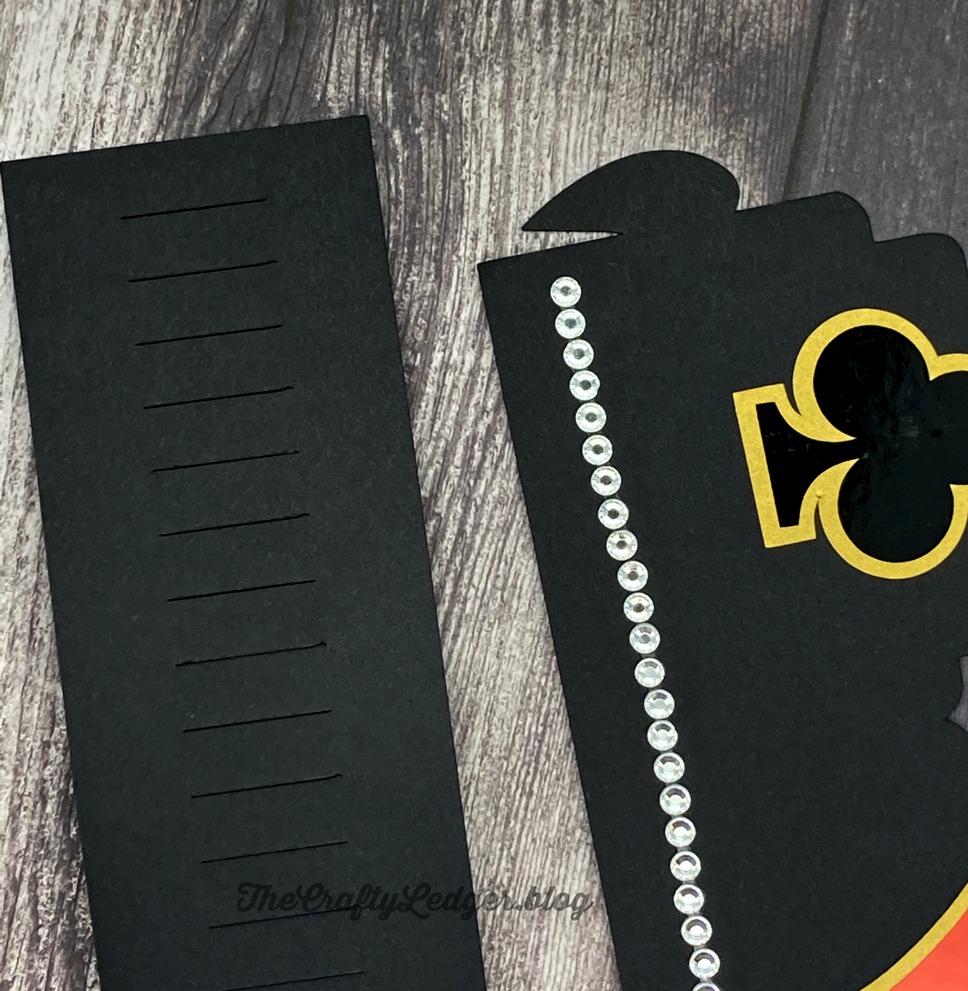
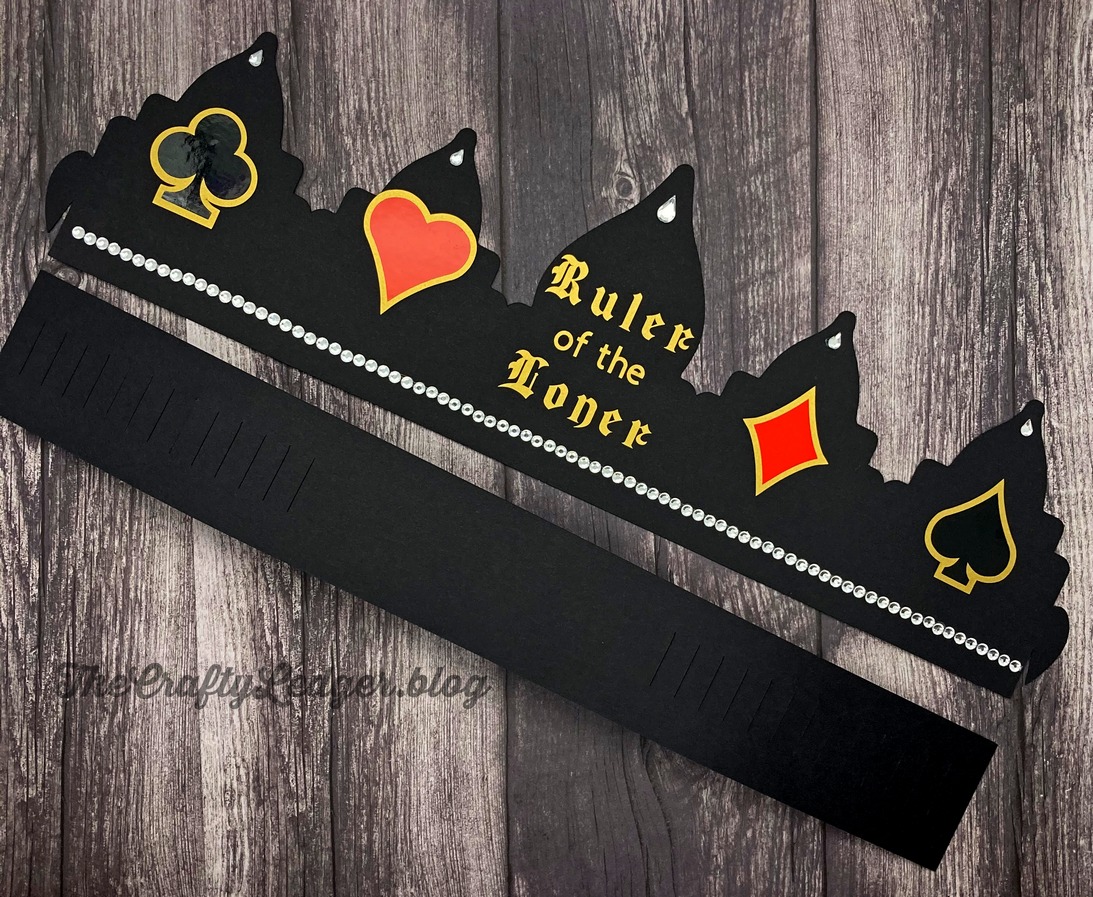
The suits of Clubs, Spades, Hearts, and Diamonds were from the CTMH Artiste cartridge. I used the offset feature to cut in gold and make the black show up on the black crown. The letters are also gold vinyl and use Blackletter and Circut Sans text.  Bling added that something special.

To make the back of the crown, I used basic shapes for a rectangle and lines (changed from score to cut).  The alignment and distribution tools helped make it uniform.  Below is a a closeup of the ends that hook together to make the crown along with the two pieces.  Each piece is 14.5 inches long and I used some 11 x 15 cardstock that I had picked up at a paper store that is a few hours from home, but has some amazing things at very reasonable prices

. endspieces

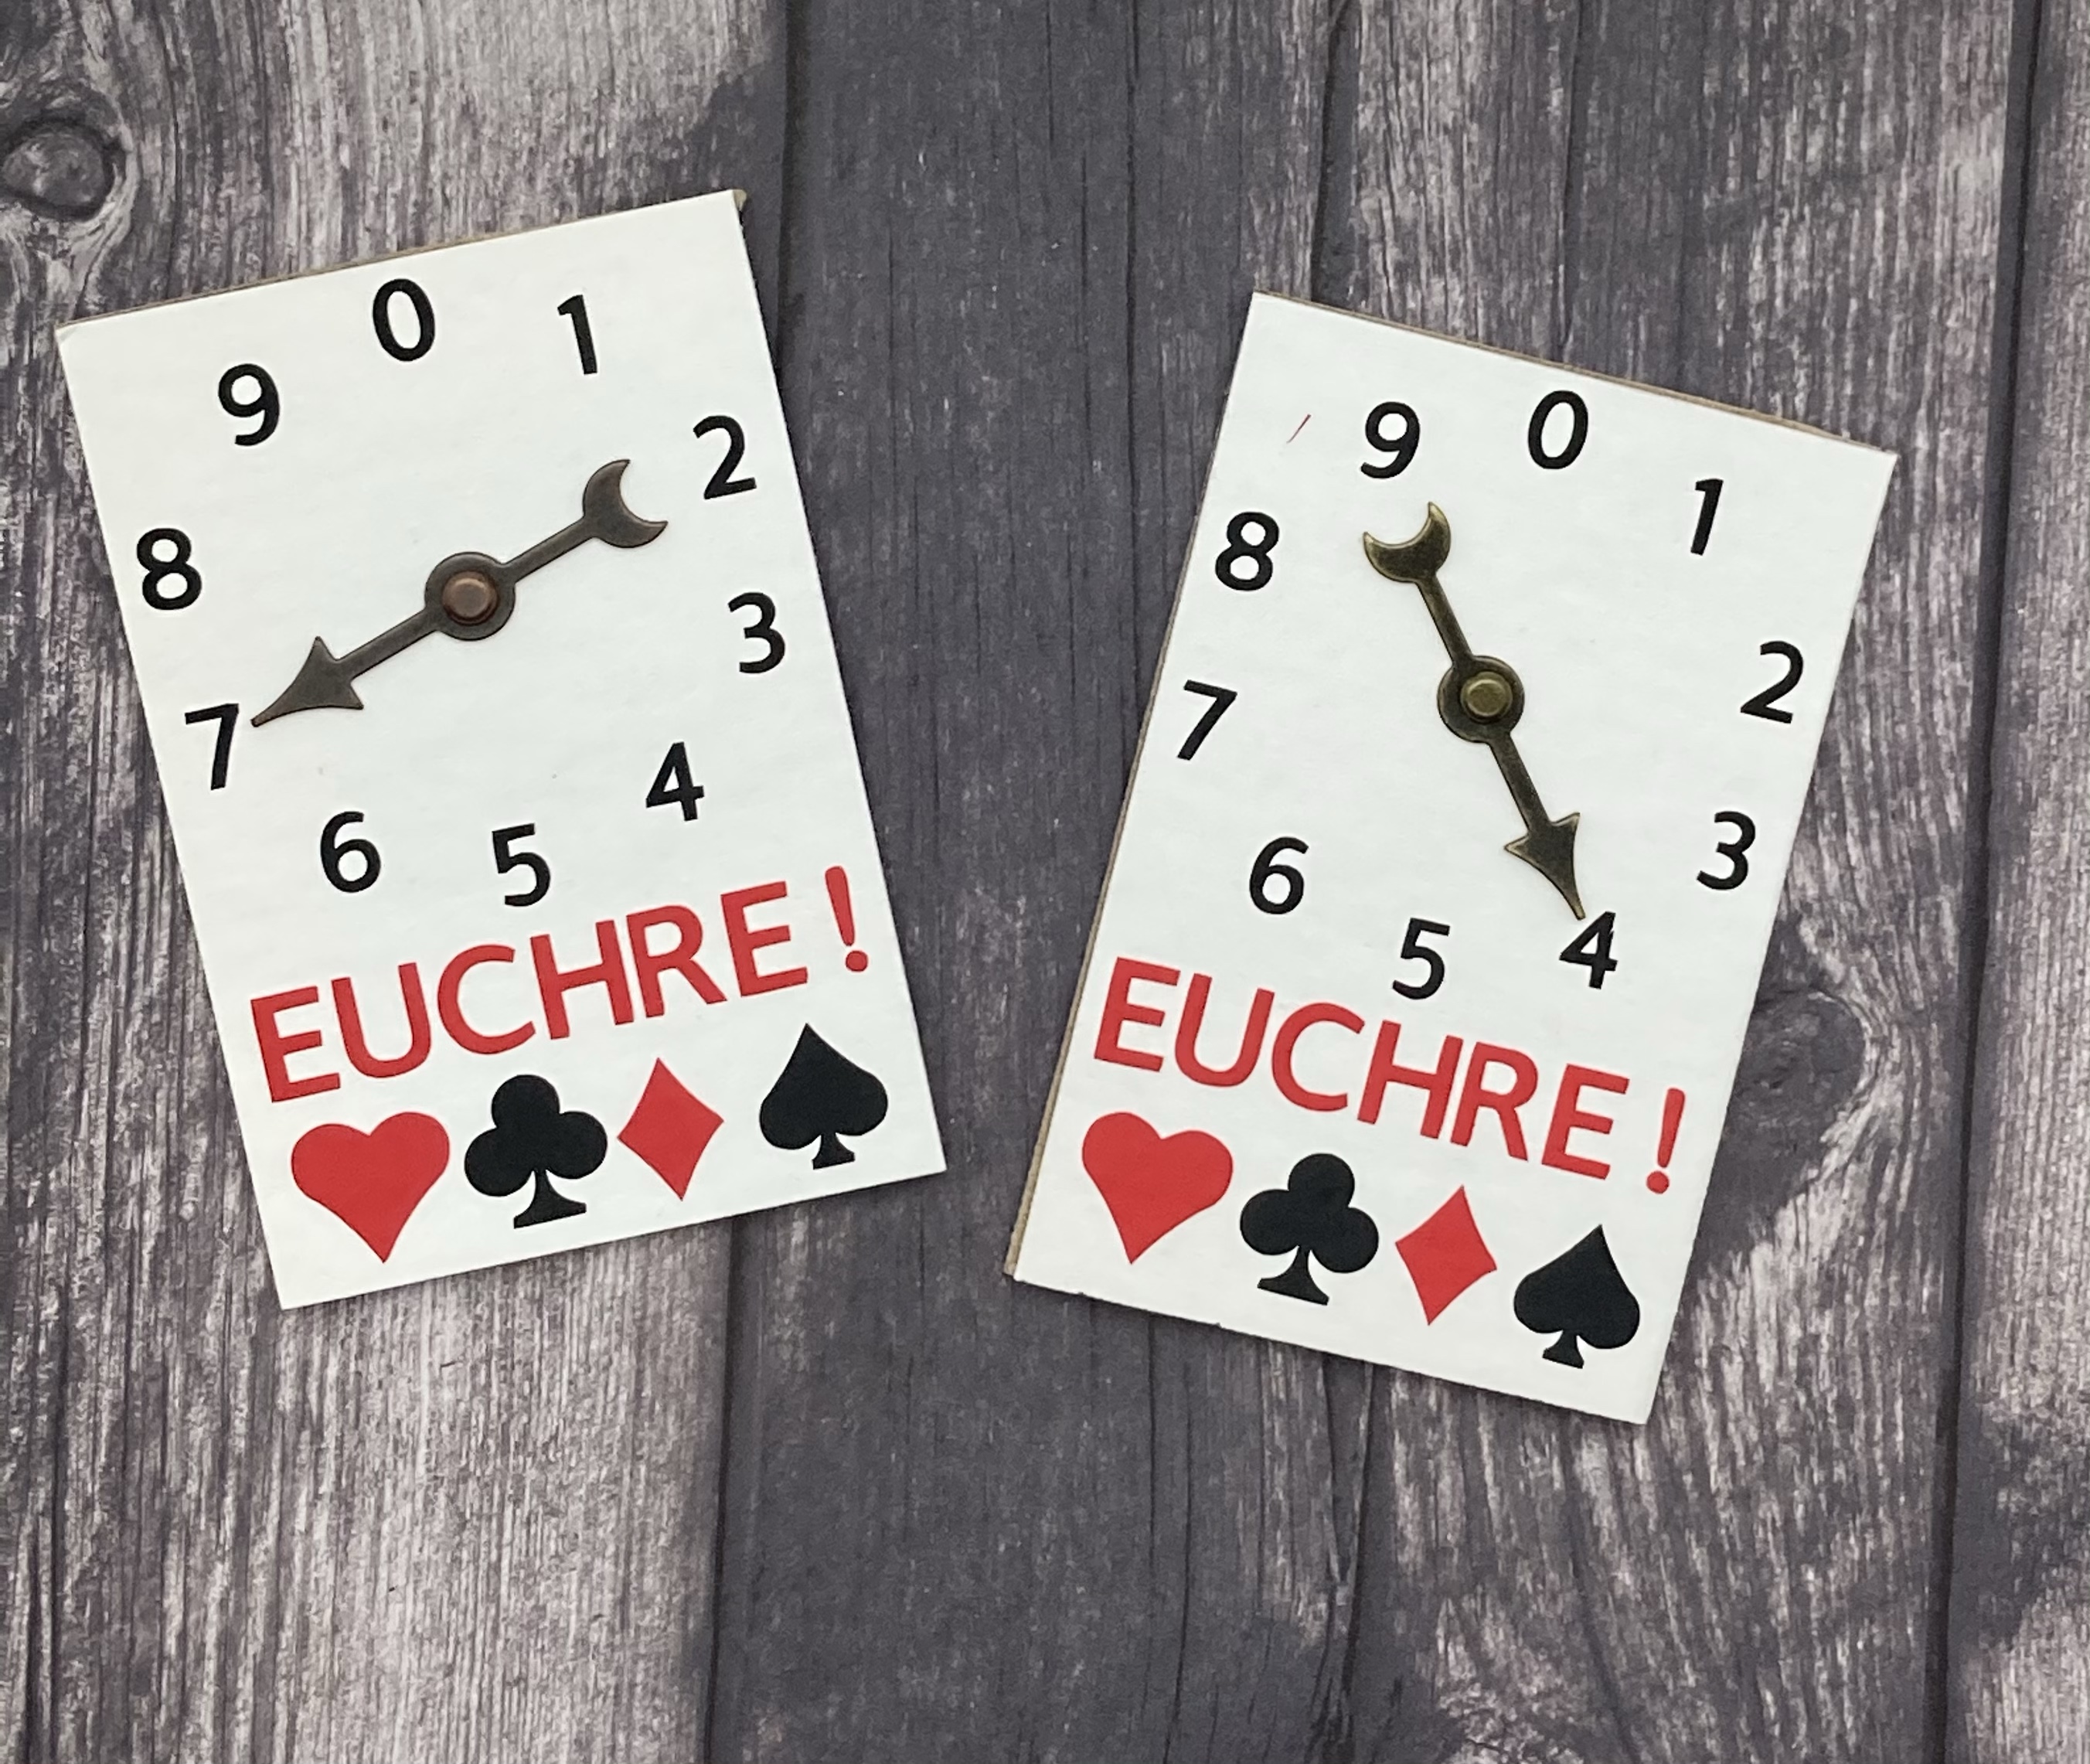
I also made some score keepers with chipboard, vinyl and game spinners I had from Tim Holtz.

Make your own project that incorporates a Fun and Games theme with your Circut and link it up at Bitten by the Bug 2 . The designers have some wonderful inspiration. – Denise

BBTB2 Heritage or Family Challenge

The challenge at Bitten by the Bug 2 is Heritage or Family.  I have had a school picture of my grandfather from 1898 for a few years now and this was a perfect excuse to scrap it.

page

This picture was given to my father by a neighbor who had had several copies made.  The names are all typed on the back.  I wanted to be able to frame the picture, but also remove it easily if we wanted to.  I found a frame from the cartridge called “The First Few Years”  that I felt would be big enough for the photo.  When the red frame on top of the tan background, I only put adhesive on the sides and bottom leaving the top free to slide the picture into.  The arrow box came from the same cartridge and I let the Cricut write the name using a free font called Telegram text.  The title came from Heritage and I cut it and the date from a bronze vinyl.  It was a quick page to do.  Picking out the paper took longer than it did to cut it.  

Make a project with your family as the inspiration using your Cricut and link it up over at Bitten by the Bug 2 by November 20.  – Denise

BBTB2 – Something to Crow About

There is a new challenge over at Bitten by the Bug 2 called Something to Crow About.  The rule is to use a crow or scarecrow in a project.  I searched through some of my older files and found this fun card from svgcuts.com .

front

This card is part of a kit called September Scenes Stand Up Cards.  I had purchased it quite awhile ago, but hadn’t made any of the cards, so this challenge was perfect for using one of them.  The card base was some green cardstock I had on hand and all the rest of the cardstock and papers were from my scraps which I keep stored by color in hanging files.  One thing I did notice about this file is that the website says it was created in 2010.  As such, it didn’t have score lines with it, but just said to fold where the instructions indicated.  Mary’s designs now have all of the score lines and videos on how things go together which is a big help.  One tip on the instruction sheet was to use raffia on the straw bale and coming out of the scarecrow’s arms and hat.  I didn’t have any of the right color, but was able to use my Spectrum Noir Markers on the white I did have to make the straw stand out. I also used a 3D embossing folder for the fence rails. This is a cute card and below is a top view to show how it stands up.

open

Make your own project with your Circut and include a crow or scarecrow, then link it up over at Bitten by the Bug 2 by November 7.  You can also get some wonderful inspiration by the rest of the design team. Happy Fall Y’all! – Denise

BBTB2 Challenge – Patterned Paper

We start another two week challenge over at Bitten by the Bug 2 to use patterned paper.  Between a new job that involves an October 15th deadline and officiating junior high and high school volleyball, I haven’t had much time in my craft room lately.  So for this challenge I did a quick card.

Pumpkin Card

I really like using patterns on things because it reminds me of appliqued quilts which I love. This is an image from Pooh and Friends which has some surprisingly cute images you wouldn’t think of with Pooh.  The papers are from Peeble’s 6 x 6 pad called Midnight Hauntings.  The green is scrap cardstock. The stamped sentiment is from Unity’s kit called Halloween Chatter.  Some Distress ink around the edges including the kraft card base and the card was done.

Grab some of your patterned paper or cardstock from your stash and create something with your Cricut then link it up at Bitten by the Bug 2 by October 24th. Have fun – Denise

BBTB2 – Witches and Ghouls

As we start October, Bitten by the Bug 2 has a new challenge called Witches and Ghouls.  I will admit that I just don’t get that into Halloween, but decided to try and make my own shadow box card.

Card

I have made a few box cards before, but this is a little more difficult because the inside tabs run the whole length of the box.  It took two tries to get the card so that it would fold flat, and isn’t perfect, but the depth effect looks good in person.  I started with basic shapes and sliced a circle into the middle of each layer.  On the front I welded a portion of the Spooky Tree from Monster Bash to the side of the circle opening. The witch is is from Autumn Celebrations and I tilted her slightly so that the end of the brooms and the very tail of her robe would overlap the circle slightly so that I could weld it the opening of the circle.  The background paper is from The Paper Studio and putting it over a circle cut in the back lets the light shine through when held up.  My original plan was to use gold velum, but I found out that I didn’t have any left, pretty hard to imagine given the size of my stash, lol.

Head on over to Bitten by the Bug 2 to link up your own Cricut project with Witches or Ghouls and get some great inspiration from the other designers. – Denise

BBTB2 – Celebrating Grandparents

Over at Bitten by the Bug 2 we are celebrating Grandparents.

I was struggling with this challenge but in remembering my Nana, I thought of her Oatmeal Cookies.  We lived about three hours away from them and whenever we would go for a visit, she would have a batch of these cookies made for us.  Sometimes she would just be taking them out of the oven as we arrived.  They were so delicious, warm and gooey.  My brothers, cousin and I still make them, especially for special occasions when we are together.

page

I used Country Life for the top line and Cricut Sans for the second line.  The second line is cut from brown vinyl which I like to use for smaller fonts.  The platter is from the Sweet Shop cartridge and I resized it slightly by taking off the ratio aspect and making it taller without making it wider.  The cookies are from Sesame Street Friends  I only used one layer from the cut which was the solid layer. Running them through my Cuttlebug with a Sizzix 3D embossing folder called Cobblestone.  I think it did a good job of giving them texture close to real oatmeal cookies.  I touched the edges and tops of the bumps with Distress Ink on my blending tool.

This is a 8.5 x 5.5″ page that will go into a cookbook I am making for my children, hopefully by Christmas.  I plan to use a mini three ring binder and page protectors so that I can make personal pages for each of their favorite recipes.  This recipe card isn’t glued down yet because I am hoping I can find the recipe in Nana’s original handwriting.

Celebrate grandparents using your Cricut and share your project over at  Bitten by the Bug 2 by September 26th.  – Denise.

BBTB2 Challenge – Anything Birthday

I have a lot of fun being one of the design team for Bitten by the Bug 2 and the challenge for the next two weeks is anything birthday.  How perfect is that because you always need ideas for birthdays.  I mentioned before that every year I do special birthday cards for my family which has been growing with marriages and children.  I now do 17 cards and choose a different technique each year, so that while they are the same kind of card, they are personalized to the people’s interests.  This year the technique is a pop-up wiper card and this is the card for my son-in-law’s birthday.

FrontFront of Card

Open

This is the card open with the hand popped up.  Since I am making so many of the wiper cards, I designed the base pieces on Design Space using rectangles and score lines.  I also put panels in the design, but when using patterned cardstock as the main pieces, you don’t need those decorative panels.  I have also started using more print, then cut elements.  In this card those are the hand and whiskey bottle which came from Designbundles.net.  After printing and cutting them, I added Glossy accents to the glass and bottle.  I actually did two sets, so that after the Glossy Accents dried, I could choose the best one. The front image is a stamp from Unity Stamp Company called Not Always…But and It is so nice to incorporate my stamps into my Cricut projects. The front sentiment is cut and written on the Cricut.  The “whiskey” and “cheers to you” are cut out of vinyl using Signature Scripts.  I like vinyl because it cuts well for small items and it lays really flat.  Since the hand sweeps up as it opens, you have to really watch what goes on the back of the of the card or it will catch.

Here is a video showing the action of the card which is the best part.


Make sure to go over to Bitten by the Bug 2 to add your own birthday project made with your Cricut by September 12. – Denise